I'd like to apologize for lack of updates lately, I've been busy, in a kind of non-busy way... if that makes any sense. I've been trying to relax and enjoy summer and just haven't gotten around to post any tech-y blog posts. However, if you didn't already know, you can subscribe to, or check out, my Shared Google Reader Page and/or my Twitter.
This summer I plan to work a lot and get a few gadgets that I've always wanted and hopefully some write-ups will soon follow after purchasing these items!
Tuesday, May 27, 2008
Sunday, April 27, 2008
Modern Life is War's Last Show.
Yesterday Dave, Abbey, Steven and I ventured off to Marshalltown to see Modern Life is War's last show ever. The main highway that goes into Marshalltown was completely under water so we were forced to take a detour. The road that finally did take us into town appeared to be just inches high enough so that it was not completely submerged as well. (I know Abbey was taking pictures of this, hopefully I can get some of those soon and post them on here!)
We met up with Dave at a Little Caesars located inside a K-mart. The food was great, and the price was even better. We got two, large one-topping pizzas, an order of crazy bread, crazy sauce and 4 small fountain drinks for like $16 bucks.
Shortly after finishing our food we left for the show. It was incredibly convenient because, since none of us really know Marshalltown all that well, the venue was actually located just a mile down the street from the strip-mall that the K-mart was in.
The show was crazy fun. So many people from all over the world (yes world, there was a guest book at the entrance and we were surprised to see that people outside of the United States were also in attendance)!
Anyways, it was an amazing show, and now on to the good stuff. I have found a flickr page, and a youtube page that have pictures and videos from the show! The flikr page I found appears to have some really excellent pictures of just how grand this show was. I'll update this thread as I find more links!
Pictures: ARTripoli's Flikr Page
Videos: Echoegko's Youtube Page
Sunday, April 20, 2008
BusySync 2.0 Comes out of Beta!
BusySync 2.0 has finally come out of beta! I'm still just in awe how god-sent this app has been for me. I jumped on board with BusySync very early in it's beta stages (beta 3) and have still yet to have a single issue with it. Interestingly enough, it appears that even though it has come out of Beta, BusyMac is still offering BusySync at the discounted price of $19.95 as a "limited time offer". So if you have ever wanted a Google Cal/iCal syncing solution, I highly recommend you pick this up before the price is bumped up to around $25 bucks!
BusyMac.com
Edit: just took a look over at BusyMac's Blog and turns out this discounted price is only valid until April 30th. Also if any of you out there are curious in trying out BusySync, I'd strongly advise you check out the final section of my original post where I link you to a blog post that explains how to easily backup your Google Calendars just incase something were to happen.
Thursday, April 17, 2008
First Impressions with Google Docs Offline. (a work in progress)
This morning I was excited to see that my account finally received the "Offline" feature update. I had been anticipating this feature roll-out since hearing about it in late March.
So naturally like most new software features/updates I installed it as soon as I was able to. Google's Offline Docs feature uses Google's Open Source "Google Gears" in order to bring you an offline experience to Google's Web-apps.
As you all already know, I love taking my web-apps offline. I love knowing that if there's anytime that I absolutely do not have access to the internet, that I can still access all my information. Plus this offline hard copy allows for assurance knowing that I have a back-up copy if Google's servers were ever to fail me.
So here's just a little bit from my first experiences with Google's Offline Docs:
Installation was quick and painless. Syncing was quick, though I don't have too many documents. It's kind of a bummer that you do have to install something to get this web-app feature to work, but it makes sense as to why you need to. My only beef so far with Google Gears is it's lack of browser support. According to Google's Help Center, Google Gears is currently only supported by Firefox when using Mac OS X. C'mon Google! (and all the open source developers working on this) Firefox is what I use the least on my Mac. At least make a plugin for Mozilla's very own Camino and hopefully support will come to Safari here in the near-future. There is hope, the page continues on by saying that more browsers will be supported soon.
Anyways, enough of my rambling, and onto the actual feature. After all my files were synced, I unplugged my computer from the network in order to test things out. Right away I noticed something that turned me off a great deal. Offline editing can only be used on word documents. That's right, as far as I can tell, there's no editing options for Spreadsheet or Presentation files. You can still view the Spreadsheets but you can't make any changes to them while Offline. Most of my Documents are Spreadsheets so this is quite a bummer. The disappointments don't stop there, you cannot create a new document when Offline. This goes for Spreadsheets, Word Documents, everything.
Second thing I noticed was pretty disappointing as well. When you do go offline (as easy as pulling out your ethernet cable or turning off, or disabling your network interface) and you point your browser to docs.google.com, I was surprised to see that it does not ask for your password, but simply just your Gmail Username. I'm not sure if I like this. So let me get this straight, if you're online and point to docs.google.com you need to authenticate with a username and password to access your documents, but if you simply pull your network cable out you just have to type in the email address and it pulls up the offline docs. Now I know the chances of someone getting onto your already logged in computer are pretty slim, it still is a little sketchy how easy it is to view them. But I guess if you think about regular word documents in non-web-apps, it's just as easy to view these files, so I'll let it slip for now, but it'd be nice to see this improved on in the future. However, I am curious as to if having to authenticate when offline would be a security risk as well. If you had to authenticate offline, that would mean it'd have to store your password somewhere on your system. And since it's just a browser plugin, I'm not sure if they'd be able to use encryption or anything to store your passwords or if it'd all be in plain-text (obviously a solution that I would not be too fond of as either).
There's one last thing that I heard that sounded a little off when I heard it. I haven't actually tried this but I read that if you make online changes and offline changes (two separate computers at the same time) when syncing the offline computer again, the online changes take priority over the offline changes. So if you edited a document offline and also editing it online, when you sync back up, you lose all your changes to the offline data and there's no warning what-so-ever, just throws away your changes. Not sure to what extent this is and I'll definitely have to test this out on my own since this doesn't sound very appealing.
But in the end, it is a web-app after all (well excluding Google Gears) and that means that improvements are inevitable. Let's just hope we see them soon.
If you are still curious about what the Google Docs Offline feature is exactly and you don't want to try it out yet, check out this youtube video that basically explains how it works.
Friday, April 11, 2008
Create an easy-to-remember URL for your Flickr Photostream.
I cannot get over how much I love Lifehacker. Thanks to Dave for first exposing me to this amazing Tech/Life blog. It's crazy how many times I've thought of a problem I had and then found a solution (see: opensource/freeware app) on Lifehacker. And today is no exception.
I'm relatively new to Flickr and I'm currently loving it. One problem I had with it however was the randomness of the URL for my photoset ( http://www.flickr.com/photos/23641570@N05/ ). All other online services I use have a nice and friendly http://USERNAME.site.com or http://site.com/USERNAME formatting. Thanks to a Godly Flickr Advanced User Guide posted over two years ago I found this amazing little tip that directly links you to setting up your own personal and easier to remember URL for your photoset. Now I can simply go to http://www.flickr.com/photos/jonathansmith68/ instead of memorizing http://www.flickr.com/photos/23641570@N05/ (hah like that was ever going to happen!).
What's really nice about this solution, is that the old link ( .../23641570@N05/ ) still works and is not a dead link! So if you have this bookmarked or hard coded into a document (such as flickr.jonathansmith68.com!) it will still take you where you want to go. Whether or not this will remain this way I'm curious to see and only time will tell.
Friday, April 4, 2008
JonathanSmith68.com!
So I finally took the dive and purchased jonathansmith68.com for one year from GoDaddy.com. Thanks to Chris Pirillo, an Iowa native, and University of Northern Iowa Alumni, I purchased jonathansmith68.com for one year for the low price of just $7.15 (see Chris Pirillo's GoDaddy Coupon's here).
As of right now I don't plan doing much hosting (if at all) with GoDaddy, since most of my online content is hosted on, I'm assuming, much more dedicated servers (and not too mention free!) but I will enjoy the little pleasures of being able to direct people to "blog.jonathansmith68.com," or "facebook.jonathansmith68.com." I did however happen to make a "homepage" or as I like to call it "an online portal" that you are redirected to when visiting jonathansmith68.com.
The Dock is written completely of Javascript and a few graphics. I must give credit to Safalra's Website for posting the great tip! I think it ended up looking pretty cool.

You'll have to check it out and tell me what you think!
Monday, March 10, 2008
Keep Dashboard Widgets on your Desktop.
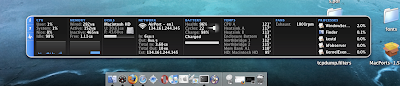
Today Dale and I were talking about iSlayer's iStat App. Dale was messing around with the options and preferences and could not seem to get some of the functionality to work. For instance he wanted to see real-time temperatures and fan speeds and all that. After checking the appropriate boxes and even closing and re-opening the program we could not seem to get the fields to show up (though it did show up just fine in the iStat Pro Widget).
So like usual, when having a problem with a piece of software, I thought about it for a second. I had then remembered seeing a post about keeping your Dashboard widgets on your Desktop. Now personally I love the idea and functionality of Dashboard. I used to be a big fan of Konfabulator (now called Yahoo! Widgets Engine) because of it's ability to show the Widgets on your Desktop (rather than hitting a button to take you to the "Heads Up Mode") but now I see you beauty of Dashboard. For the most part, widgets are things that you need to see rarely, and in short durations (however this has exceptions), so I think Apple hits the nail right on the head with Dashboard. Another reason for my love of Apple's approach is the fact that my Macbook's Desktop's Resolution is nothing too special (coming in at 1280x800). Having so little space, I have no room to keep widgets cluttering my desktop. But this is merely personal preference and if I were someone like Dave, with his 24" iMac (1920x1200), I might think differently on this issue.
Here's where the solution comes into play. There's an awesome little hack to enable widgets to be on your desktop at all times. Simply open Terminal and then type in the following command:
defaults write com.apple.dashboard devmode YES
After entering this command you'll need to restart the Dock by entering following command:
killall Dock
After you've down both commands you can simply open Dashboard (F12), click and drag/move around the widget, continue to click and drag the widget and hit F12 again. When you've got it where you want it. Drop it (let off on the mouse/track pad) and it should stay on your desktop. To get it back in Dashboard, simply do the same click/dragging in reverse order. The reason why I stressed the dragging is because after doing a few tests of just clicking the widget while attempting to do this, the widget seems to get locked and lost in a layer that is neither the Dashboard nor the Desktop, and the only way to be able to grab the widget again is to invoke another "killall Dock."
Try it out, hope you like it.
Note:I have not tried this out on Leopard yet, but works perfectly on our office Macbook with Mac OS X Tiger 10.4.11. I'll have to try it out on my 10.5.2 Macbook later tonight. Turns out it does work on Leopard as well!
So like usual, when having a problem with a piece of software, I thought about it for a second. I had then remembered seeing a post about keeping your Dashboard widgets on your Desktop. Now personally I love the idea and functionality of Dashboard. I used to be a big fan of Konfabulator (now called Yahoo! Widgets Engine) because of it's ability to show the Widgets on your Desktop (rather than hitting a button to take you to the "Heads Up Mode") but now I see you beauty of Dashboard. For the most part, widgets are things that you need to see rarely, and in short durations (however this has exceptions), so I think Apple hits the nail right on the head with Dashboard. Another reason for my love of Apple's approach is the fact that my Macbook's Desktop's Resolution is nothing too special (coming in at 1280x800). Having so little space, I have no room to keep widgets cluttering my desktop. But this is merely personal preference and if I were someone like Dave, with his 24" iMac (1920x1200), I might think differently on this issue.
Here's where the solution comes into play. There's an awesome little hack to enable widgets to be on your desktop at all times. Simply open Terminal and then type in the following command:
defaults write com.apple.dashboard devmode YES
After entering this command you'll need to restart the Dock by entering following command:
killall Dock
After you've down both commands you can simply open Dashboard (F12), click and drag/move around the widget, continue to click and drag the widget and hit F12 again. When you've got it where you want it. Drop it (let off on the mouse/track pad) and it should stay on your desktop. To get it back in Dashboard, simply do the same click/dragging in reverse order. The reason why I stressed the dragging is because after doing a few tests of just clicking the widget while attempting to do this, the widget seems to get locked and lost in a layer that is neither the Dashboard nor the Desktop, and the only way to be able to grab the widget again is to invoke another "killall Dock."

Try it out, hope you like it.
Note:
Subscribe to:
Posts (Atom)


